1.Pytorch
1)개요
=>pytorch는 python을 위한 오픈 소스 머신러닝 라이브러리
=>facebook이 만든 라이브러리
하는 일은 tensorflow 와 동일
=>설치는 pip install torch torchvision
=>딥러닝을 학습할 때 Tensorflow 나 Pytorch 둘 중 하나는 가지고 학습을 합니다.
딥러닝 모델을 이용해서 서비스를 개발하다보면 모델들이 둘 중 하나의 형태로만 제공되는 경우가 있습니다
이런 경웅에는 어쩔 수 없이 학습한 라이브러리가 아닌 다른 라이브러리를 이용해서 작업을 수행해야 합니다.
=>현재는 딥러닝 연구 분야에서는 pytorch를 많이 사용하고 서비스 개발에는 tensorflow 를 많이 씀
=>tensorflow 는 버전이 너무 자주 바뀜
import numpy as np
import matplotlib.pyplot as plt

#딥러닝 프레임워크 중 하나인 파이토치의 기본 모듈
import torch

#PyTorch Module 중 딥러닝 모델을 설계할 때 필요한 함수를 모아놓은 모듈
import torch.nn as nn

#torch.nn Module 중에서도 자주 이용되는 함수를 ‘F’로 지정
import torch.nn.functional as F

#컴퓨터 비전 연구 분야에서 자주 이용하는 ‘torchvision’ 모듈 내 ‘transforms’, ‘datasets’ 함수를 임포트
from torchvision import transforms, datasets
=>GPU 사용가능할시
if torch.cuda.is_available():
    DEVICE = torch.device('cuda')
else:
    DEVICE = torch.device('cpu')

print('Using PyTorch version:', torch.__version__, ' Device:', DEVICE)
=>MNIST 데이터 실습
BATCH_SIZE = 32
EPOCHS = 10

'''  MNIST 데이터 다운로드 (Train set, Test set 분리하기) '''
train_dataset = datasets.MNIST(root = "./data/MNIST",
                               train = True,
                               download = True,
                               transform = transforms.ToTensor()) # tensor로 변경

test_dataset = datasets.MNIST(root = "./data/MNIST",
                              train = False,
                              transform = transforms.ToTensor())

#데이터를 메모리에 가져오는 작업
#데이터를 메모리에 가져오는 작업을 로드한다라고 합니다
train_loader = torch.utils.data.DataLoader(dataset = train_dataset,
                                           batch_size = BATCH_SIZE,
                                           shuffle = True)

test_loader = torch.utils.data.DataLoader(dataset = test_dataset,
                                          batch_size = BATCH_SIZE,
                                          shuffle = False)
tensorflow 는 일반적으로 데이터가 풀어진 상태로 다운을 많이 받음. pytorch는 numpy로 압축해놔서 train_loader 를 활용해서 데이터를 메모리에 가져옴
=>type 및 사이즈 확인
for (X_train, y_train) in train_loader:
    print('X_train:', X_train.size(), 'type:', X_train.type())
    print('y_train:', y_train.size(), 'type:', y_train.type())
    break
=>모델 생성
#모델 설계 - 사용자 정의 클래스 이용
#python은 다중 상속이 가능한 언어

class Net(nn.Module):
    def __init__(self):
    	#첫번째 상속받은 클래스의 init을 호출
        super(Net, self).__init__()
        #layer를 구성
        self.fc1 = nn.Linear(28 * 28, 512)
        self.fc2 = nn.Linear(512, 256)
        self.fc3 = nn.Linear(256, 10)

    def forward(self, x):
    	#1차원 펼치기
        x = x.view(-1, 28 * 28)
        #입력층 생성
        x = self.fc1(x)
        x = F.sigmoid(x)
        #히든층 쌓기
        x = self.fc2(x)
        x = F.sigmoid(x)
        #출력층 만들기
        x = self.fc3(x)
        x = F.log_softmax(x, dim = 1)
        return x

model = Net().to(DEVICE)
optimizer = torch.optim.SGD(model.parameters(), lr = 0.01, momentum = 0.5)
criterion = nn.CrossEntropyLoss()

print(model)
=>train 함수
#훈련하는 사용자 함수 정의
#훈련 중 원하는 로그를 출력하기 위해서

def train(model, train_loader, optimizer, log_interval):
    model.train()
    #데이터를 순회하면서
    for batch_idx, (image, label) in enumerate(train_loader):
        #훈련 가능한 데이터로 변경
        image = image.to(DEVICE)
        label = label.to(DEVICE)
        #image 를 가지고 출력을 생성
        optimizer.zero_grad()
        output = model(image)
        #손실 계산
        loss = criterion(output, label)
        #역전파
        loss.backward()
        #다음 스텝으로 진행
        optimizer.step()

        if batch_idx % log_interval == 0:
            print("Train Epoch: {} [{}/{} ({:.0f}%)]\tTrain Loss: {:.6f}".format(
                epoch, batch_idx * len(image),
                len(train_loader.dataset), 100. * batch_idx / len(train_loader),
                loss.item()))
=>evaluate 함수
def evaluate(model, test_loader):
    model.eval()
    test_loss = 0
    correct = 0
    with torch.no_grad():
        for image, label in test_loader:
            image = image.to(DEVICE)
            label = label.to(DEVICE)
            output = model(image)
            test_loss += criterion(output, label).item()
            prediction = output.max(1, keepdim=True)[1]
            correct += prediction.eq(label.view_as(prediction)).sum().item()

    test_loss /= len(test_loader.dataset)
    test_accuracy = 100. * correct / len(test_loader.dataset)
    return test_loss, test_accuracy
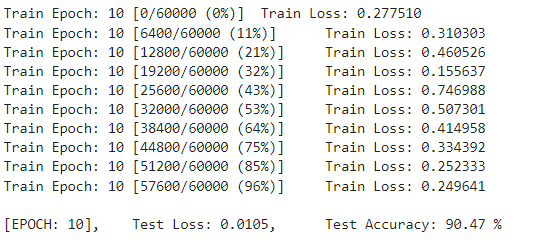
=>결과 확인
#실제 훈련
for epoch in range(1, EPOCHS + 1):
    train(model, train_loader, optimizer, log_interval = 200)
    test_loss, test_accuracy = evaluate(model, test_loader)
    print("\n[EPOCH: {}], \tTest Loss: {:.4f}, \tTest Accuracy: {:.2f} % \n".format(
        epoch, test_loss, test_accuracy))
'Study > Deep learning' 카테고리의 다른 글
| Deep learning(9)-LLM (0) | 2024.03.26 |
|---|---|
| DeepLearning(7)- AutoEncoder,생성모델 (0) | 2024.03.26 |
| Deep learning(6) - 자연어처리 (1) | 2024.03.25 |
| Deep Learning(5)-RNN (0) | 2024.03.22 |
| Deep learning(4) - CNN (0) | 2024.03.21 |


